Building a Home Server in 2018
I have run a small Linux server at home for the past 10 years. It started out as a playground for various Linux projects, since I use a Windows desktop PC and a Macbook Pro for day-to-day activities. For example, I used it to write a web service in college that would monitor my Facebook account for pokes and would poke back anybody who poked me (I got into a few poking wars with friends who didn’t realize I had a bot poking for me). I also used to run this blog on the server, but moved it to Digital Ocean (referral link) about a year ago for better network availability. These days, I mostly just use it as a file server to backup personal data.
Unfortunately, my server has been on the fritz lately. Most of the time, it will hang after being on for less than 30 minutes. I caught a kernel panic message once that seemed to indicate a problem with the RAM, but I ran memtest86+ on it overnight without any errors. I booted an Ubuntu live CD, and scanned the disk drives, but that didn’t show any errors. However, the live CD continued running without issue for a week before I shut it off. At this point, I suspect something is corrupted on the OS drive, but I decided that if I am going to bother reinstalling the operating system, I should also upgrade the hardware.
Server Hardware Components
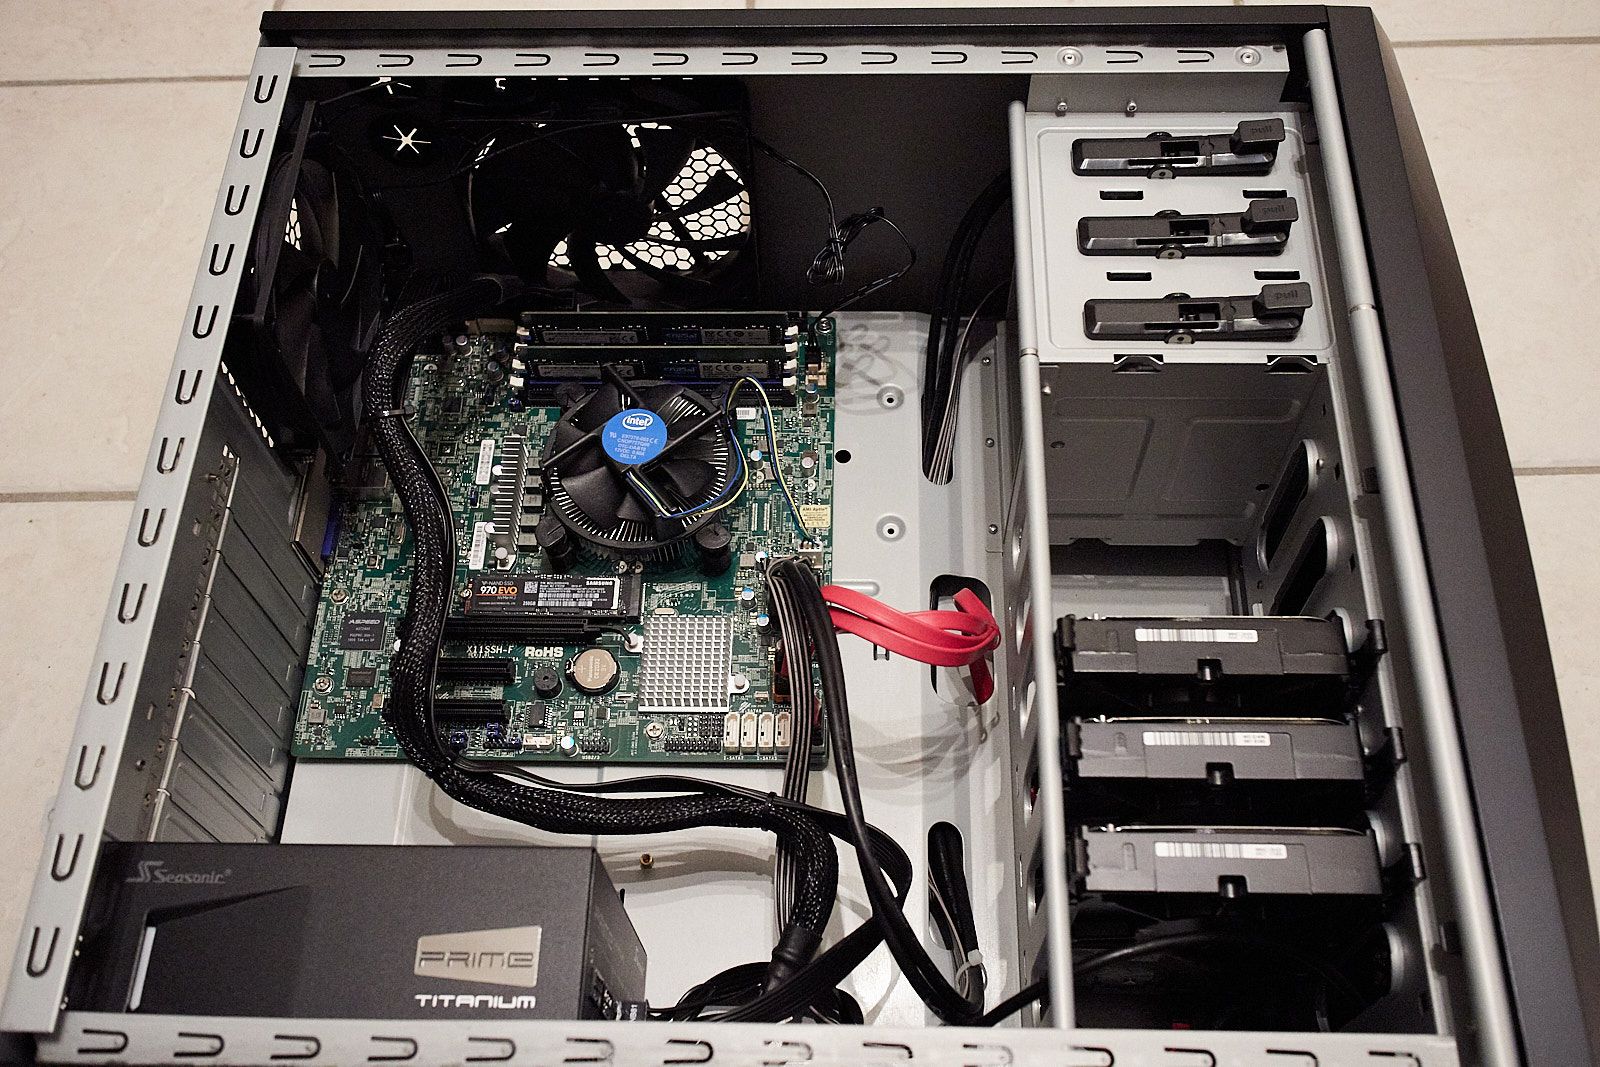
My server builds have historically been budget builds, using hand-me-down parts from my gaming PC. It has been upgraded and downgraded several times over the years as moved things around to fix my own computers and those belonging to family members. The latest iteration contained a rather ancient AMD Athlon processor with 2 GB of RAM. Not only is that a little underpowered, but also not very efficient (idled at about 90-100W).
For the new server, I wanted to get some modern hardware to improve power consumption, but also something with more server-like features. I had a hard time finding a combination that I was completely happy with, but finally settled with the following:
| Part | Cost |
|---|---|
| Intel Xeon E3-1240 v6 Kaby Lake 3.7 GHz Processor | $289.99 |
| SUPERMICRO MBD-X11SSH-F-O Motherboard | $198.99 |
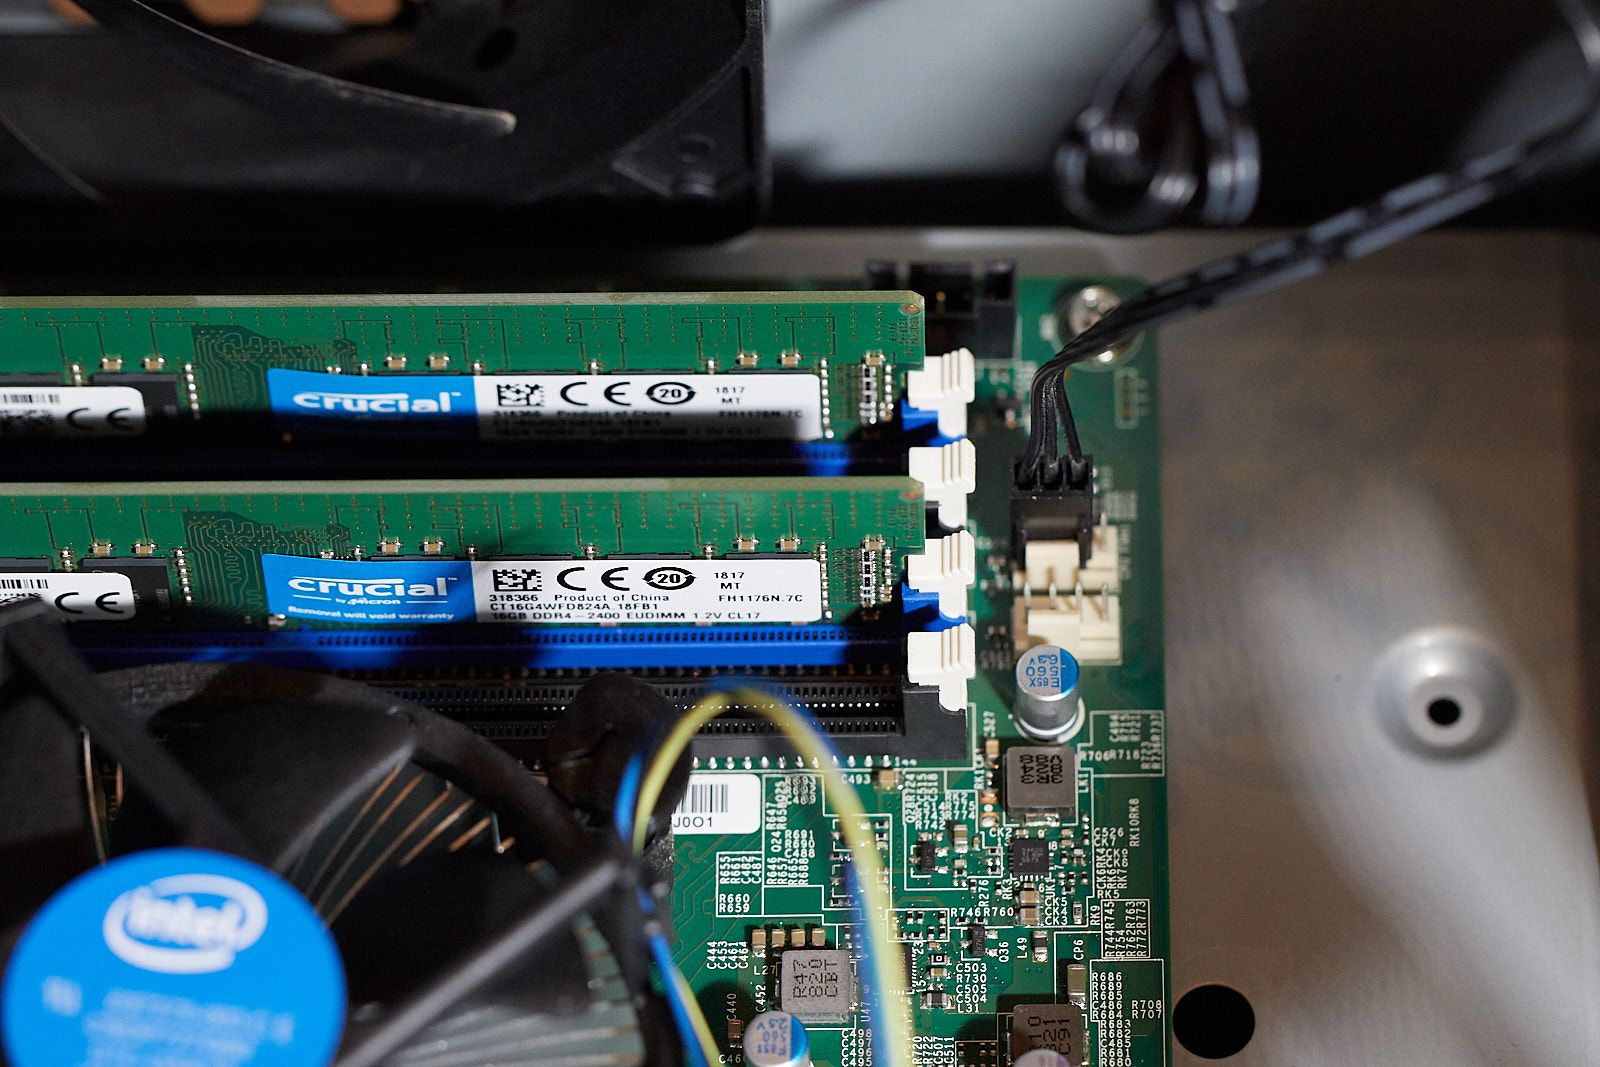
| Crucial 16GB DDR4 2400 MHz ECC RAM (x2) | $378.00 |
| Seasonic PRIME Ultra 650W 80+ Titanium Power Supply | $152.06 |
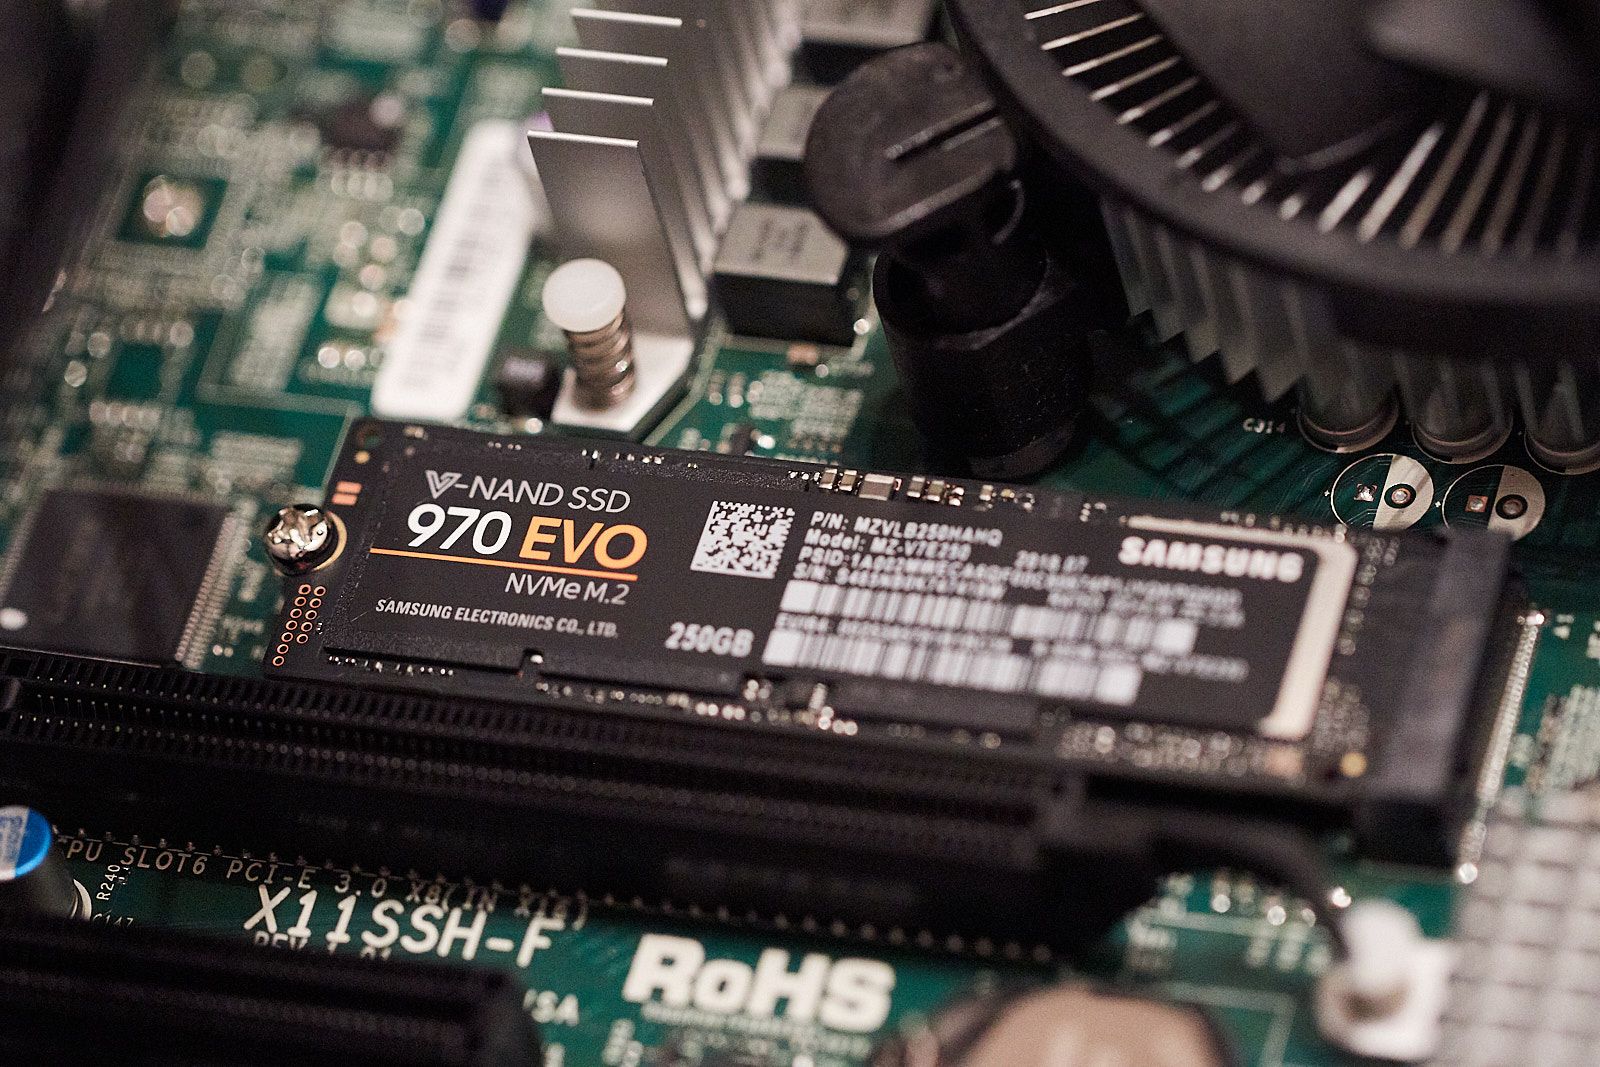
| SAMSUNG 970 EVO M.2 2280 250GB PCIe NVMe Drive | $97.99 |
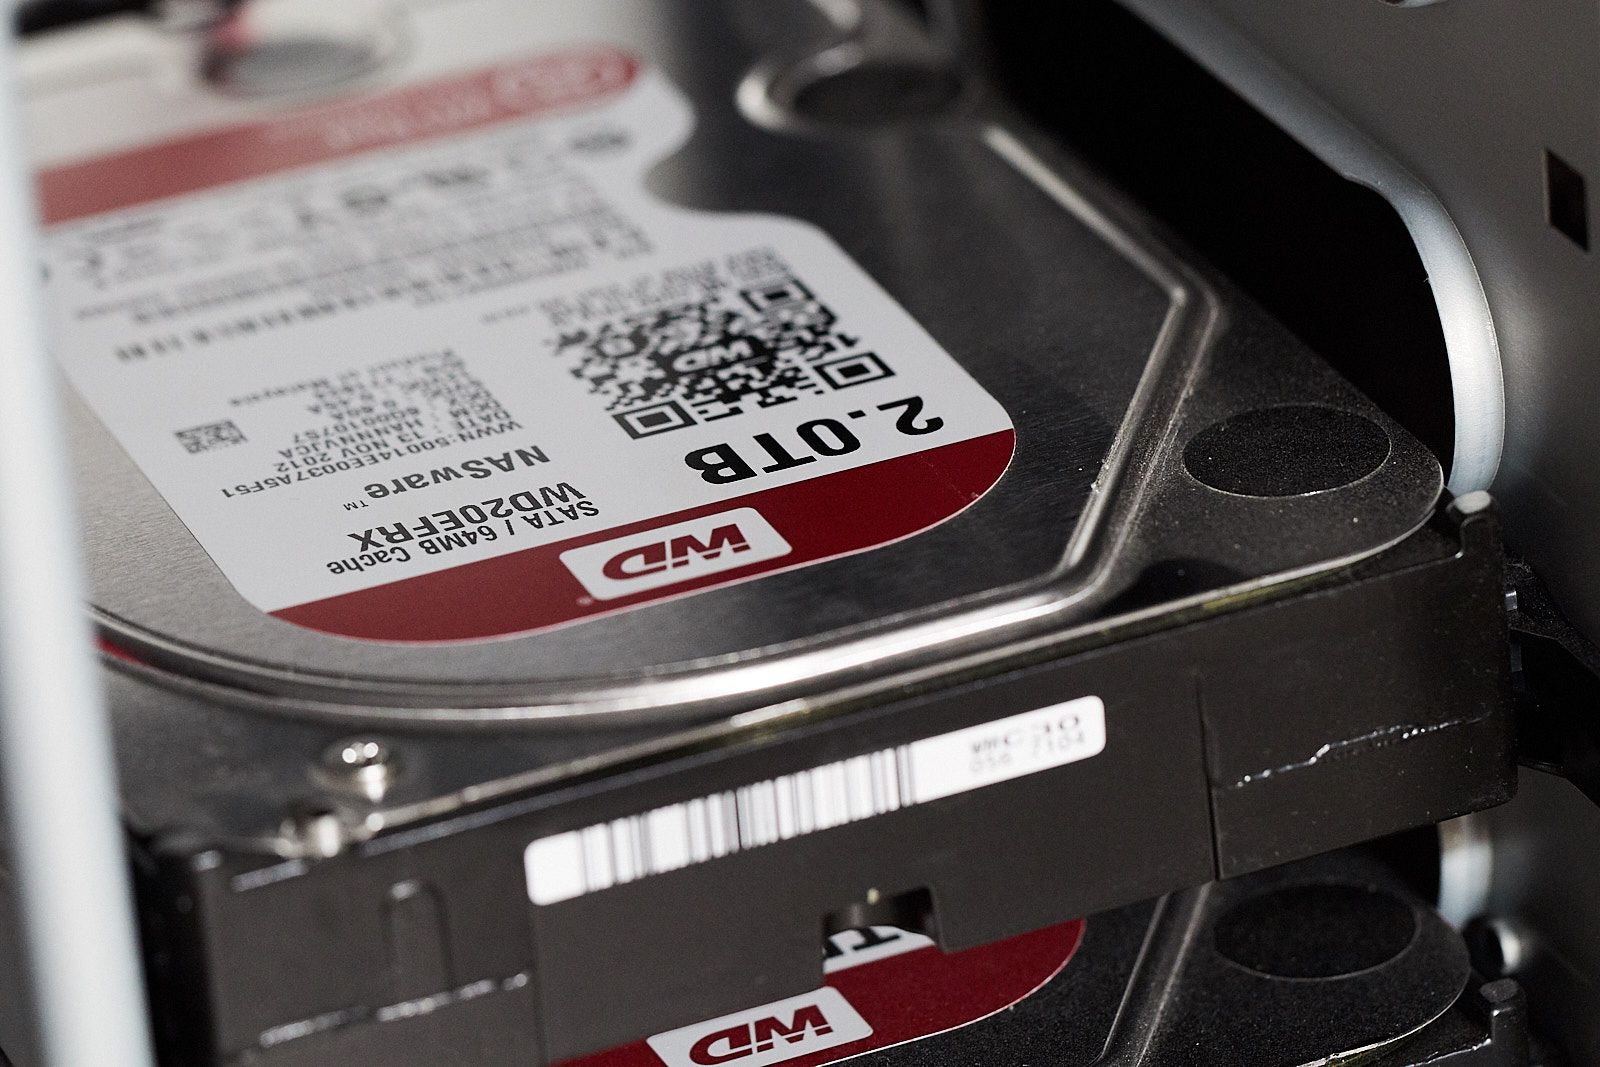
| WD Red Hard Drives from the old server (x3) | $0.00 |
| Antec Three Hundred Two Case from the old server | $0.00 |
| Total | $1,117.03 |
I’ve included my thought process below of why I chose these parts.
CPU
I chose an entry level Xeon part for my CPU because it is one of the cheapest parts that still supports ECC (more on that later). The E3-1240v6is a 4 core (8 thread) part with no integrated graphics (not needed for this build). It is built on a 14 nm process (Kaby Lake), so it is power efficient, but packs some compute power. One thing I unfortunately overlooked while shopping for this build is that Intel is releasing their new Coffee Lake Xeon processors in October. If I had realized this, I might have waited, but I’m not sure it would have made a huge difference, since it is still built on a 14nm process. The biggest change in Coffee Lake is the availability of 6-core processors, which would have been cool, but probably unnecessary and probably harmful for my idle power.
I did spend a lot of time seriously looking at AMD alternatives, but couldn’t find something that made sense. The AMD Ryzen parts are very attractive in price and performance, and supposedly support ECC memory (unofficially), but there seem to be very few motherboards with support for ECC. Most of these motherboards are designed for gamers, and I couldn’t find any with IMPI for remote management. I also looked at AMD EPYC processors, which do have motherboards with ECC and IPMI, but these are a lot more expensive. I was also worried that such high TDP parts would idle kind of hot.
Motherboard
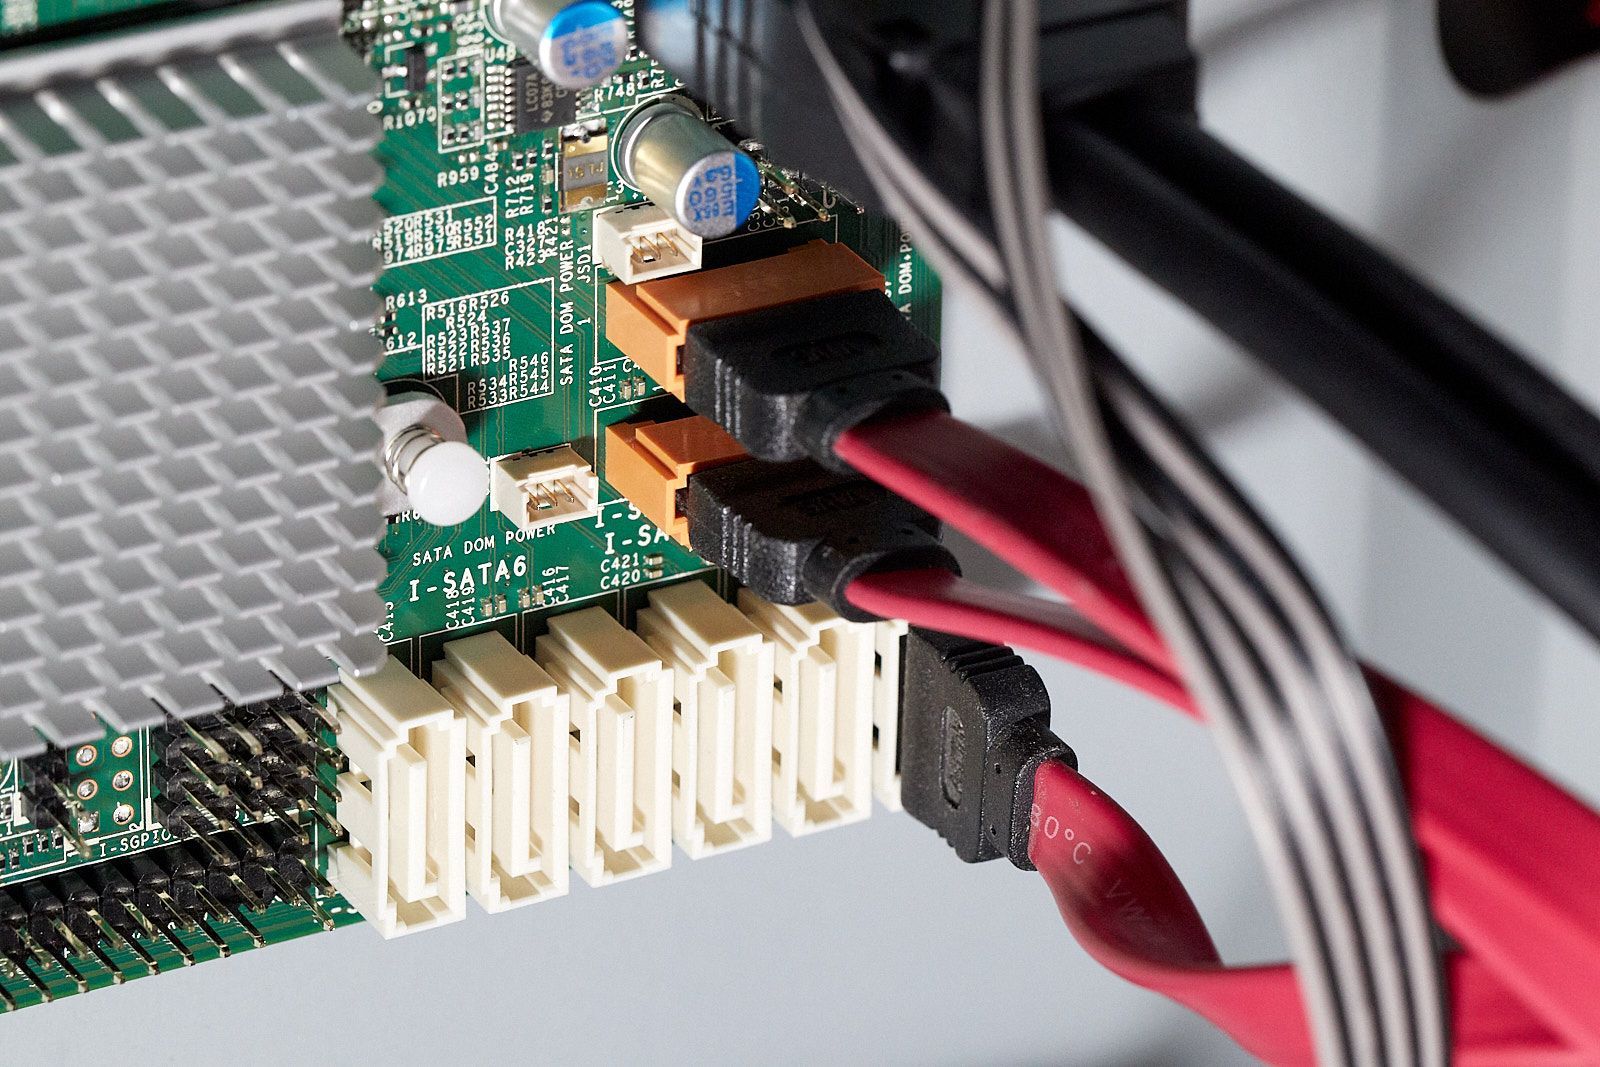
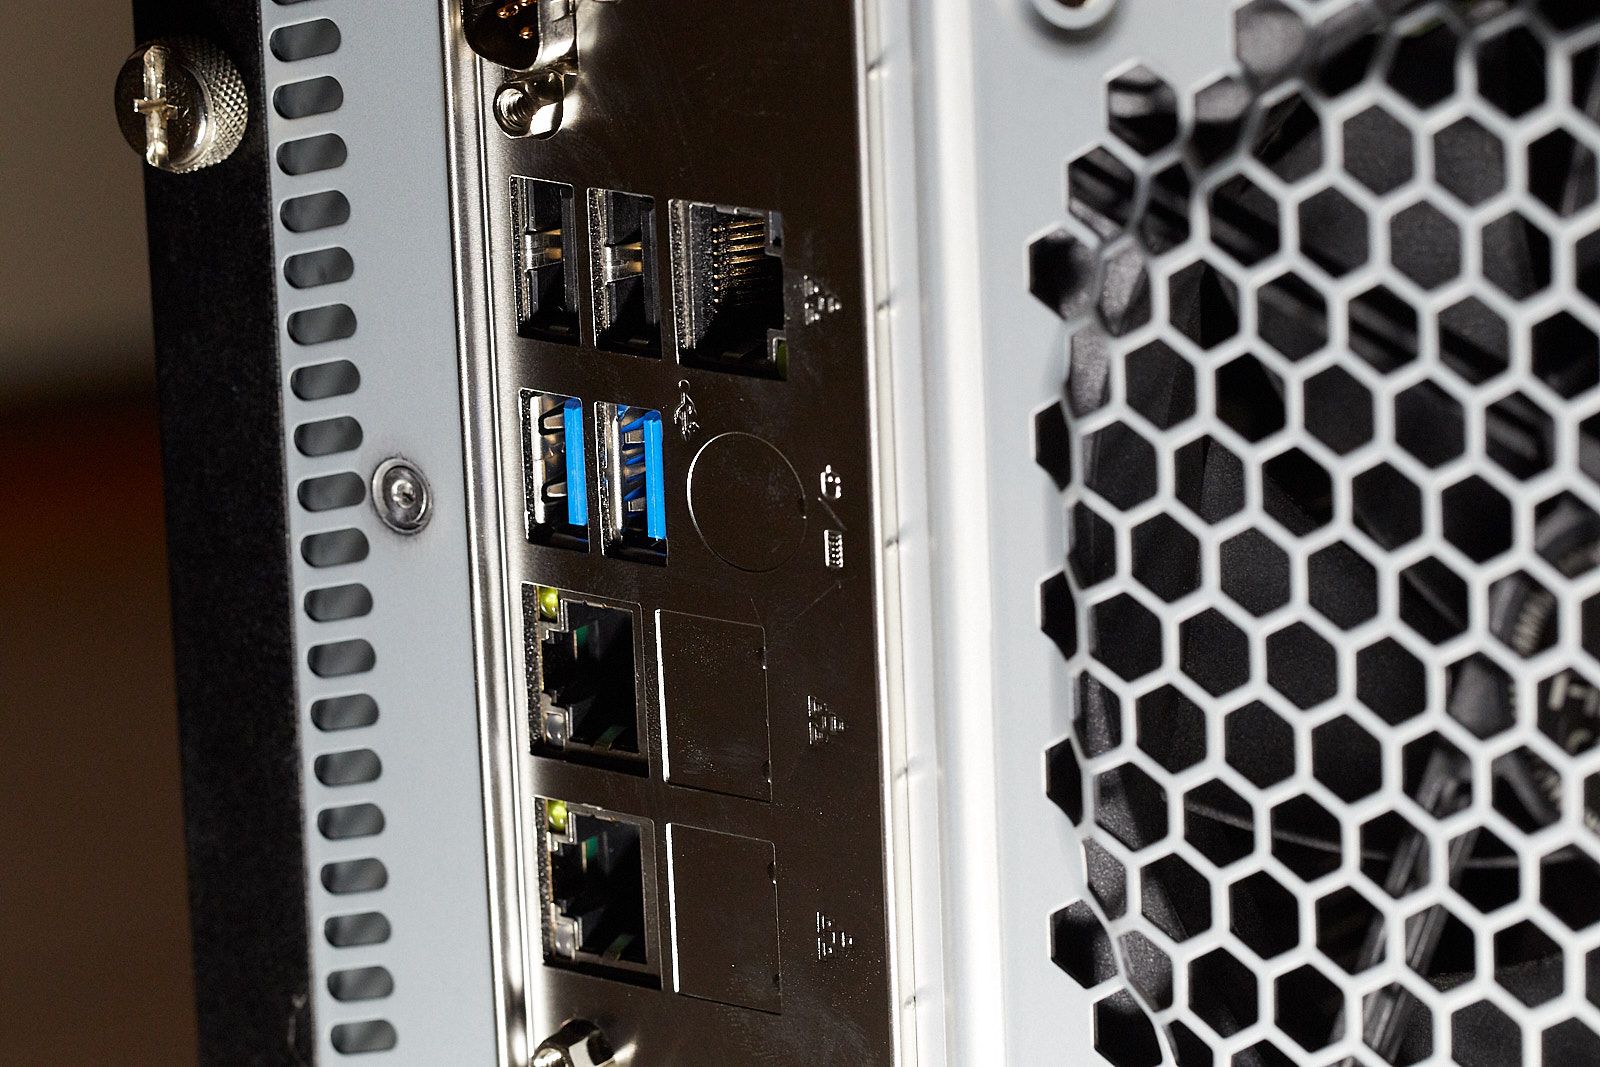
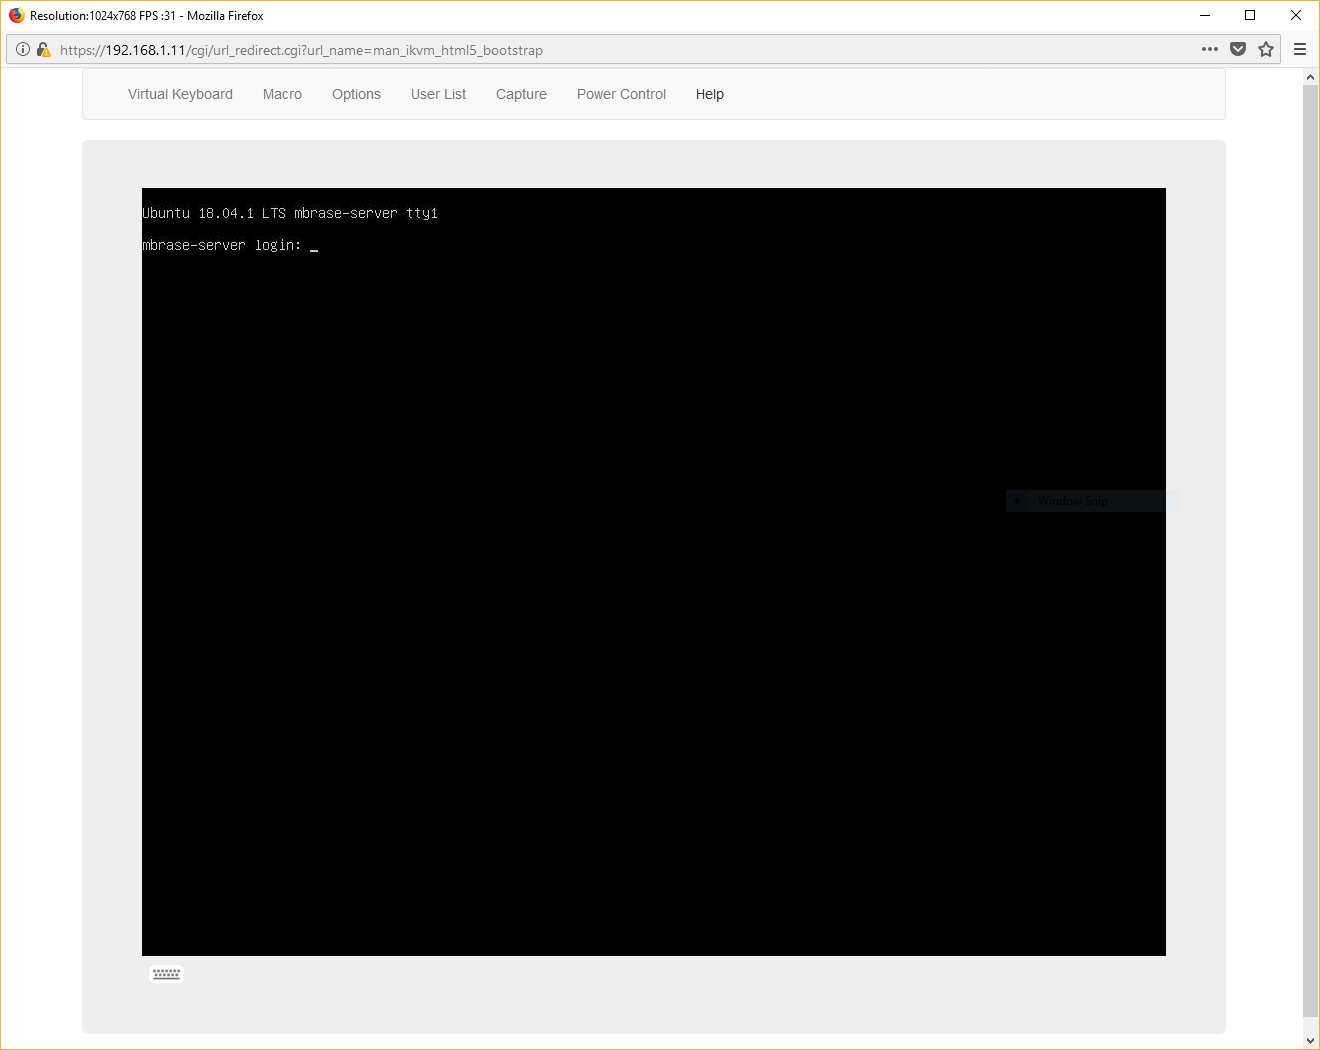
I chose the MBD-X11SSH-F-Omotherboard because it had good reviews and had the features I was looking for. Specifically, it has 2 Intel NICs, 8 SATA ports, PCIe M.2 slot, IPMI interface, and supports up to 64 GB of DDR4 ECC RAM. Let’s take a moment to talk about IPMI. IPMI is an interface provided separate onboard processor (BMC) which enables remote management. It has its own ethernet port, and if you point your web browser to it, it allows anything from power cycling the server, to having a virtual KVM console (displays what is on the server’s screen, lets you type, move the mouse, etc). This is something I’ve never had before but loved the idea because I despise pulling out a monitor and keyboard to diagnose server issues.
I looked at some other boards from different manufacturers but read some reviews that some people got boards with an old BIOS flashed, that did not support the latest Kaby Lake processors. To fix this, they had to either ship the board back, or buy an older LGA 1151 processor to install temporarily so that they could update the BIOS. In contrast, the Supermicro board came with the latest firmware already installed. I have also read some mixed things about the IPMI interface on other boards, which sometimes require IE6, or Java to use the virtual console. The Supermicro supports an HTML5 virtual console, which is modern and portable.
RAM
I chose two sticks of 16 GB DDR4 ECC RAM. I wasn’t very picky on brand, and Crucial has a good reputation. I decided on two sticks, so that it could make use of both memory channels and maximize performance. If I ever need more memory, I can buy another two sticks for a max of 64 GB. ECC vs non-ECC is a hotly debated topic on the Internet, where some people think it is crazy to run a NAS without it, and some people think the dangers of memory corruption are way overblown. In the end, I succumbed to peer pressure and decided that a little extra protection was worthwhile.
Power Supply
One thing that may not be obvious is my choice of power supply, since I picked 650W power supply for a system expected to be under 100W most of the time. What is special about it is that it is 80 Plus Titanium Certified, which is highest 80 plus efficiency rating. The Titanium level specifies at least 90% efficiency under 10% load and even better at higher loads. In my case, this gives 90% efficiency at 65W and beyond, which is close to my target idle power. Titanium is also the only level that certifies the 10% load area, whereas the other ratings only go down to 20%. I could have gone with a lower wattage power supply, but none of those are certified to have as high efficiency in the low end. I also like that it is fully modular, which makes cable management easier.

Storage
My old server was my last machine in use that didn’t boot from an SSD, so I thought it was about time for an upgrade. I picked an M.2 NVMe drive because it is faster than SATA and it saves a SATA port for the data drives. This is also my first M.2. NVMe drive and I was eager to try it out.
For the data drives, I decided to reuse the existing Western Digital Red drives from the old server. They were setup in a software RAID5 configuration, so it is trivial move them and keep the data intact. The WD Red series is optimized for NAS storage, though some of them are almost 6 years old. I will probably replace them after my wallet recovers, but I haven’t quite decided what I want instead. One option I’m considering is a 6 drive ZFS RAID-Z2 setup (two drive parity, similar to RAID6).
First Impressions
My first impressions are very good so far. I received the last of the parts this past weekend, assembled them, and installed Ubuntu 18.04.1 Server on it. The system seems stable and idles at 56W (measured with external Kill-A-Watt meter). I’m really impressed with the power supply, since it only turns on the fan if needed (i.e. never), and it is cool to the touch. My old 400W power supply was always blowing out warm air from the back. The IPMI capability is fantastic, and I was able to boot, load the install media over the network, and go through the install process without having to physically touch the server.
One thing I was a little disappointed about was the time it takes for it to bootup (about 1m 17s total). Most of this time (1m 5s) is spent in the UEFI part of the boot, but once it passes control to Linux, it finishes up quickly. I’ve heard that NVMe drives can take longer to boot than SATA SSDs, despite being faster, due to UEFI drivers taking longer for NVMe initialization, but I’m not sure if it is related in this case.
The only hiccup I encountered was that I had some trouble mounting an ISO with the HMTL5 virtual console. To do it, it requires the ISO to be put on a SMB network share and the path/login info to be provided. I never got it to work with my Windows 10 machine (though it appears others have). I ended up having to use the Java based console to mount the ISO, which ended up working just fine. I suppose this isn’t so bad, since I rarely need to install operating systems, and can use the HTML5 console the rest of the time.